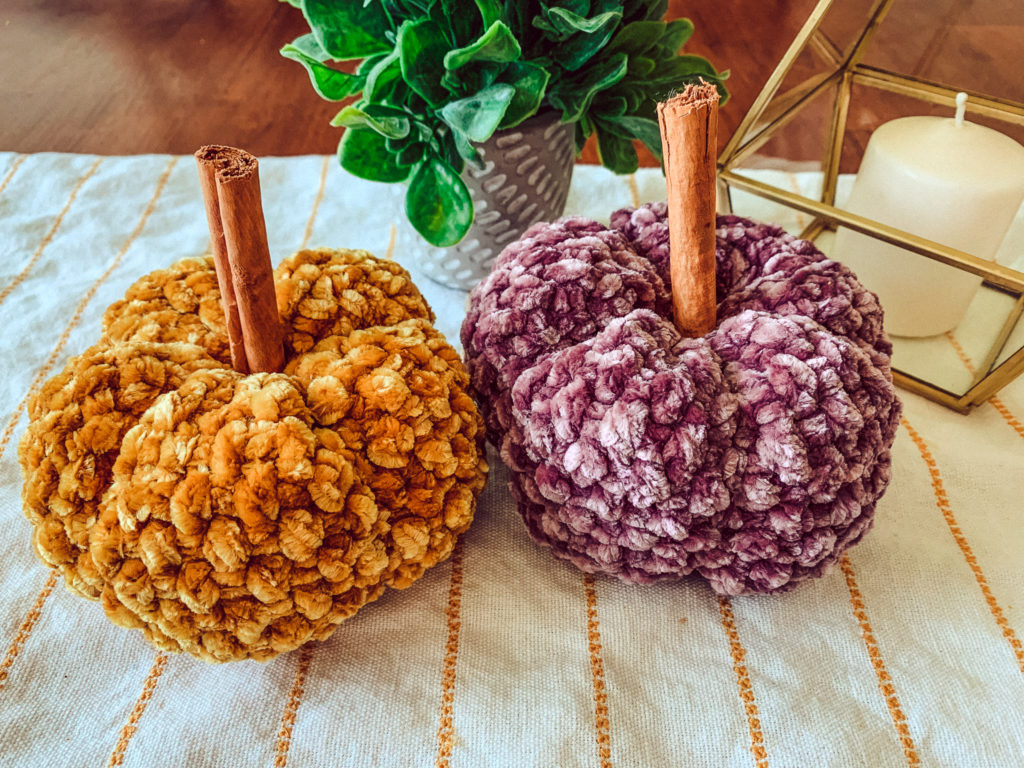
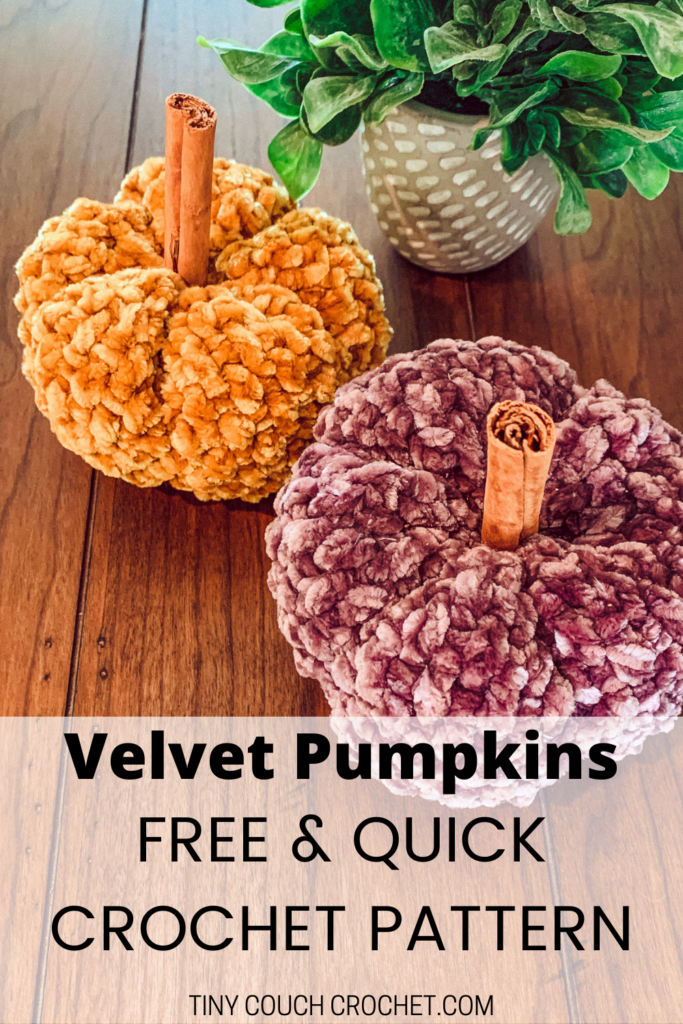
These velvet crochet pumpkins are the perfect kick-start to the holiday season. They are quick and easy to make because you do not have to feel to find the top stitch of the rows to make this pattern. I repeat – you do not have to find the top stitch! Thanks to stitches and methods specific to working with velvet, these pumpkins are hassle-free and perfect for your own home, as a gift, or as a quick make for fall markets.
Looking for more free crochet patterns for Halloween? Check out the Reversible Trick or Treat pillow pattern here, or these Easy Plaid Pumpkins here!
Scroll down for the free crochet pumpkin pattern below, or pin this post for later.
This post contains affiliate links, which means I receive a small commission, at no extra cost to you, if you make a purchase using this link.
Working with velvet doesn’t have to be scary
There is just something about velvet that screams “autumn” to me, especially in certain colors. There’s also something about velvet that makes crocheters and knitters want to stay away from it. When using the right stitches, it really is simple and fun to use, and the end result is so worth it! If you’re curious about using velvet for other projects, check out this blog post recommending specific stitches to use with velvet yarn. We use some of those stitches in this project – the Front Post Double Crochet and Back Post Double Crochet.
Another method I used is the Chainless Foundation. While you can absolutely start this pattern with a foundation chain and work Row 1 into this chain, I find it hard to count chains when using yarn like velvet. Chainless foundations solve that problem for me. Scroll down to the Abbreviations section for a written description and short video tutorial.
What You’ll Need
Here are the materials you’ll need:
- 1 skeins of Bernat Velvet Weight 5 Yarn or similar. I used the colors below:
- Shadow Purple
- Golden Moss
- Size 4.5mm crochet hook (I like to use the hooks from this crochet hook set)
- A yarn or tapestry needle
- Scissors
Size:
These are little guys, roughly 5″ in diameter and 3.5″ tall.
The pumpkins are made by crocheting a rectangle and shaping from there. If you want to make larger pumpkins or pumpkins that vary in size, that can easily be done by starting with more chains/ chainless foundation stitches and adding more rows. To keep the proportions shown in the photos, make the height of the rectangle roughly half the width of your rectangle.
Abbreviations (U.S. Terminology):
Ch = Chain
St = Stitch
Yo = Yarn Over
DC = Double Crochet
FDC (optional): Chain 4. FDC into 4th chain from your hook (first chain you made): Yo, insert hook into chain, pull up a loop, Yo and pull through first loop on hook, Yo and pull through next two loops on hook, Yo and pull through remaining loops on hook. Now FDC into bottom loops of previous FDC: Yo, insert hook into bottom 2 loops of previous FDC, pull up a loop, Yo and pull through first loop on hook, Yo and pull through next two loops on hook, Yo and pull through remaining two loops on hook.
Continue to FDC into the bottom loops of the previous FDC until you have the number of stitches called for in pattern. (See video below for quick tutorial)
FPDC = Yarn over (YO), insert hook around the front of the post of the stitch below so that the post is in front of your hook, YO and pull up a loop (3 loops on your hook). YO and pull through first two loops (two loops left on your hook). YO and pull through remaining two loops.
BPDC = Yarn over (YO), insert hook around the back of the post of the stitch below so that the post is behind your hook, YO and pull up a loop (3 loops on your hook). YO and pull through first two loops (two loops left on your hook). YO and pull through remaining two loops.
Note: This pattern uses a combination of FPDC and BPDC known as the Rice stitch, or Mini-Basketweave stitch. You can find full instructions and a photo tutorial of the rice stitch here.
Autumn Velvet Pumpkin – Free Crochet Pumpkin Pattern
Foundation & Row 1, Option 1 (chainless foundation): Make 48 FDC (48 St)
Foundation & Row 1, Option 2 (standard): Chain 51. Dc in 4th chain from hook and in each remaining chain. (48 St)
Row 3: Chain 3. FPDC in first stitch (not stitch directly under chain 3, but the next). *BPDC in next stitch, FPDC in next stitch, repeat from * until end of row. Dc in chain 3 from below or first chainless foundation stitch. (48 St)
Row 4: Chain 3. FPDC in first stitch (not stitch directly under chain 3, but the next). *BPDC in next stitch, FPDC in next stitch, repeat from * until end of row. Dc in chain 3 space. (48 St)
Rows 5 – 14: repeat Row 4.
Finishing: Fasten off by leaving a very long tail – at least 5 times the width of your rectangle.
Wrap the ends around so that you have a cylinder and sew the two ends together with the long tail. Now close up the bottom of the pumpkin by weaving in and out of the foundation chain/stitches, similar to closing a beanie. Pull tight and stitch over the hole a bit to close it. Now insert yarn needle, which should still have a long tail left, through the bottom hole and pull the tail up into the middle of the pumpkin.
At this point, you can start to stuff your pumpkin. Now we’re going to close the top – pick a place to start weaving your hook in and out of the top stitches and close the top like you closed the bottom. It’s ok to pull on the yarn to lift the bottom of the pumpkin up – this will help shape it. Finish stuffing your pumpkin and close the top. Don’t cut the tail yet!
You will now want to wrap the tail down one side of the pumpkin and insert yarn needle into the bottom hole and up through the middle and through the top hole. Pull tight. Continue to do this a few more times to give your pumpkin that pumpkin shape! Now you can weave in your end and cut the remaining tail or hide it in the middle 🙂
Complete your crochet pumpkin by crocheting a stem, or hot gluing a cinnamon stick (pictured here), regular stick, wine cork, or whatever you have around the house that fits your aesthetic. And there you have it! The perfect decor for fall.

If you make yourself (or someone else) a velvet pumpkin, I’d love to see your work! Please use hashtag #tinycouchcrochet and tag me in social media posts so that I can share! I am @Tinycouchcrochet on both Instagram and Tiktok. I hope you enjoyed this free crochet pumpkin pattern and I can’t wait to see your pumpkins!
-Ashley